Welcome!

Welcome to Your Stardoll Makeup Tutorials. If you're looking for new ways to enhance and improve your medoll, then you've come to the right place. This blog is full of hints, tips and tutorials to get your medoll Covergirl worthy!

Monday 28 May 2012

Tutorial ~ Classic Smokey Eyes

This is an extremely popular look on stardoll at the moment. I don't think it will ever go out of fashion, seeing as it's so versatile.


You will need:

Black and White Liquid Eyeliner
Black and White Eyepencil
Black, White and Brown Eyeshadow
Black Lengthening and Volumizing Mascara
Red Lipstick
Brown/Red/Dark Pink Blush


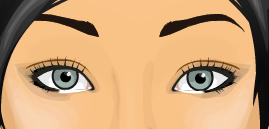
Start off with black eyeliner around the top, outside corner and under the eye, and the white under the eye as shown.


Apply the black eyepencil wherever you applied the black eyeliner, and the white eyepencil wherever you applied the white eyeliner.


This step looks more complicated than it actually is. Start by sweeping black eyeshadow out and up to the sides, almost to the eyebrow. Use fewer layers the higher up you get, to create the blending effect. Add some white at the top, under the eyebrow. Apply the brown on the inside as shown in the picture, and apply some white between that and the black.


Use only one coat of deep red lipstick ~ you don't want it to be too bright, we want all the attention to be focused on the eyes.


Apply the blush under the cheekbones.


Add both types of mascara.


Use a couple of pairs of fake eyelashes ~ seeing as your original eyelashes have been lost in all the black eyeshadow.


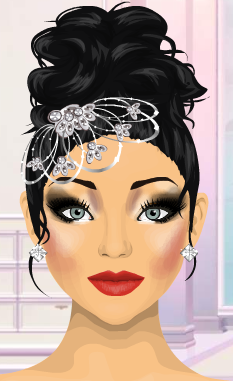
And there we go! Add some glamorous accessories, and you're done.


Susanna x


Tutorial ~ Natural Makeup

This makeup is so pretty, and is easy to do. It gives a great natural appearance, and really highlights your medoll's features.

Here's the finished medoll:


You will need:

Brown and White Liquid eyeliner
Brown and White Eyepencil
Brown Lengthening and Volumizing Mascara
Brown, Light Brown, Beige and White eyeshadow
Nude Lipstick
Luxe Lipgloss
Peach Blush


Start by applying the eyeliner as shown in the picture: Brown around the eye, an white under the eye, along about half way.


Use the white eyepencil to make a large 'v' shape around the tear ducts. Use the brown eyepencil all the way along the top, and just around the outside corner a bit, to round it off.


Apply the brown eyeshadow above the eye, sweeping out and up to the sides. A couple of layers will do. Apply the white under the eyebrow as shown in the picture, and use the beige in between the two colours, to blend them in.


Next, apply brown on the insides as shown. This helps to contour the nose and add shadows. Use the light brown to blend between the skin and the brown.


Use the nude lipstick all over the lips.


Add the Luxe lipgloss in the centre of the lips.


Apply the blush under the cheekbones. Not too much, remember, it's meant to look natural!


Apply both kinds of mascara.


You can leave it at that, but I recommend using a pair or two of fake lashes. Because I used no black makeup, the eyes don't stand out very much. These help the eyes to stand out, without looking over the top.


Yay! All done! I added an orchid with this look, which adds to the whole beautifully and delicately feminine look.


Susanna x


Sunday 27 May 2012

Essentials for Every Medoll's Beauty Parlour

I thought it would be good to write a post with a list of essentials for your medoll. The following are great things to have in your Beauty Parlour, and are a must for every medoll.


Ok so these are really important: Black Lengthening Mascara, Black Volumizing Mascara, Black and White Eyepencil and Black and White liquid eyeliner.


Next is a selection of eyeshadows. I think black and white are the most important, and you definitely need these. The others I included in the picture are good to have too: A light brown and a dark brown, and then a few of your favourite colours.


Blush is great to have. Personally, I think you only really need about three colours: A red, a pretty pink, and a neutral peach/brown, depending on your skin tone. A peach for lighter skin, and a brown for darker skin.


And finally, lipsticks. I recommend Luxe lipgloss. It may be expensive, but it's definitely worth the stardollars. Also, the lipsticks you should have are: nude (skin tone), red, peach and a rosy pink.


And there you have it! Your essentials. They're all super things to have in your beauty parlour, and you can"t really go wrong with them.


Susanna x


Saturday 26 May 2012

Tutorial ~ Dior Makeup

Ok, so this tutorial is based on a photo that I found, and it's by the fashion designer Dior. I thought I may as well give it a go, and show you guys how to do it!


Here's the photo inspiration and the finished makeover:


So yeah, this is what I'm going to try!


You will need: 

White Lengthening and Volumizing Mascara
White eyepencil
White and Black eyeliner
Orange, White, Peach, and Brown eyeshadow
Blush of your choice
White and Peach/Pink Lipstick
Luxe Lipgloss


Right, so start off with a small bit of black eyeliner circling the eye, and the white under the eye. Also draw a wing with the white out to the ears, and apply at the tear ducts too.


Completely surround the eye with the white eyepencil ~ apply as much as possible.


Apply the orange eyeshadow as shown in picture. A couple of layers will do ~ you don't want it to be too lurid!


Use the white eyeshadow just underneath the eyebrow. Use the peach in between the white and orange. This will help to blend it in.


Apply the brown eyeshadow as shown in the picture ~ this will help to contour the nose and make it look more 3D. Also use the two white mascaras.


Apply the white lipstick.


Then apply one layer of the peach/pink lipstick. This may sound weird, but trust me, it works. You see, the peach/pink lipstick on its own is too dark, but if you put it over the white, it's paler.


Apply the lipgloss in the centre of the lips. Don't use it at the edges ~ you just want a small bit of shine.


Use the blush under the cheekbones ~ just a small bit will do.


Use a couple of pairs of eyelashes ~ I adjusted them to make them really big. Make sure you put the bottom lashes under the white eyepencil, not at the real lash line. This helps to make the eyes look bigger.


And there we go! All done ~ you can add any accessories you want. I used Sunny Bunny contacts.


Susanna x