Welcome!

Welcome to Your Stardoll Makeup Tutorials. If you're looking for new ways to enhance and improve your medoll, then you've come to the right place. This blog is full of hints, tips and tutorials to get your medoll Covergirl worthy!

Monday 10 December 2012

Rainbow Makeup!


I was incredibly bored, and so I created this cool, if slightly unusual look.


I partially got the inspiration from this, which looks amazing:


Love? Hate? Share your opinions in the comments below.
Susanna x

Sunday 4 November 2012

Hey Guys!

Hi Everyone, Just to let you all know, that I'm off to spend a week in Kilkenny with relatives, and I probably won't have access to a computer. So, there won't be any new posts for a week or so. Don't worry though, when I get back, everything'll be back up and running again.

See you soon,

Susanna x

Tuesday 30 October 2012

Tutorial ~ Witch Makeup

Happy Halloween everyone!

Halloween is a time to go wild with the makeup and costumes, and so I have here a tutorial for Witch Makeup.

(For some more Halloween inspiration, click here.)

Here's the finished Witch makeup:


You will need:

Black, White, Khaki Green and Light Green eye pencil
Black Lengthening and Volumising Mascara
Medium Brown, Khaki Green, Black and White Eyeshadow
Orange Lipstick
Orange Lipliner (optional)
Lipgloss
Brown Blush


Start off with the eye pencil ~ A small line of white as shown, then a tiny bit of light green. Then apply the khaki green (the light green helps the white and khaki to blend). Finish with a large wing of black. Don't put very much on the top of the eye, just draw a straight line from above the pupil out as far as you can go.


Use the brown eyeshadow to create shadows around the nose. Apply a couple of layers of the khaki green, building up into a large wing, almost reaching the eyebrow. 


Use the black eyeshadow to blend the black eye pencil into the khaki eyeshadow. Apply a small bit of white below the eyebrow as shown as a highlight, and use a tiny bit of the white on the eyelid as shown. Finish by adding a bit of black eyeshadow under the eye.


Colour the lip orange as shown, in a kind of a 'T' shape.


Apply the lipgloss over the orange area.


Use the blush in the hollows of the cheeks as shown.


Apply both mascaras. For accessories, I used a pair of Sunny Bunny lashes, and a pair of spooky contacts. Add a couple of warts if you want!


Happy Halloween!

Susanna x


Wednesday 17 October 2012

Before and After Makeovers

Here's a selection of some before and after makeovers ~ which is your favourite? Why not post some of your own before and after makeovers too?

And by the way, by doing this, I'm not saying that any of the medolls are ugly, all the medolls are pretty in their own way, I'm just styling them in my way :)

Left ~ Before
Right ~ After


I hope you guys enjoyed!

Susanna x


Friday 21 September 2012

Fun Stuff

Ok, if you're bored, here's something to try: Put your makeup on from a distance. Trust me, it's actually pretty fun!

Simply zoom out in your beauty parlour as much as possible, and put your makeup on from there. Sounds easy, right?


Looks pretty good? 


Yeah, well, you were WRONG.


*scream*


Why not give it a go, and post your attempts in the comments below. It's harder than it looks!


Susanna x

Wednesday 29 August 2012

Tutorial ~ Vintage

I adore this kind of style, and, it's surprisingly easy to do. It can be used for everyday (if you don't go overboard), or fancy dress, and is very Marilyn Monroe.


You will need:

Black and White Eyeliner
Peach and Brown-Red Eye Pencil
Light Brown, Medium Brown and Dark Brown Eyeshadow
Red Lipstick
Orangey-red Blush (L'Occitane is perfect)
Black Lengthening and Volumising Mascara


Start by applying the two eyeliners as shown in the picture. This is a bit tricky, so don't worry if you get it wrong, keep practicing, and remember that it doesn't have to be perfect!


Next, use the pale peach eye pencil on the eyelid, and the russety brown under the eye as shown.


Apply a couple of layers of mediumbrown eyeshadow. Note: The eyeshadow can't be applied over the eye pencil, so that makes it easier to apply above the eyelid.


Use a small bit of light brown eyeshadow to contour the nose as shown. Use the white below the eyebrow, and add a tiny bit of dark brown where the medium brown meets the peach eye pencil.


Apply the red lipstick. I used a slightly orangey-red because I thought it looked more vintagey than regular red.


Apply an orangey-red blush under the cheekbones.


Apply the two mascaras.


And finally, colour the eyebrows black (or dark brown if your me doll has fair hair), add a mole and a couple of pairs of eyelashes, and you're done!


Susanna x


Thursday 14 June 2012

Tutorial ~ Mermaid Makeup

Mermaid makeup is a fun style to try. You can really go overboard with the whole sea theme. You know, pearls, shells, etc.


Here's the look we're aiming for:


You will need:

Black, Bright Turquoise, Medium Turquoise, Pale Turquoise and White Eyeliner
Black, White and Medium Turquoise Eyepencil
Dark Turquoise, Light Brown, White, Pale Turquoise and Black Eyeshadow
Any Luxe eyeshadow
Nude and Turquoise Lipstick
Luxe Lipgloss
Brown and Turquoise Blush


Start off with the eyeliner: The black out to a little wing and underneath the eye up to the iris. Continue on on the bright turquoise, then medium turquoise, and then pale turquoise. Finish with white on the inside corners of the eyes.


Apply the black eyepencil starting from your wing of eyeliner and across the top of the eye to the centre. Use the white to make a "v" around the inside corners of the eye. Apply the turquoise eyepencil under the turquoise eyeliner


Don't forget to shade the eyebrows in black. You can change this in the "Face" section of your Beauty Parlour, or with an eyebrow pencil.


Add a bit of light brown eyeshadow to contour the nose. Apply a couple of layers of the dark turquoise eyeshadow as shown in the picture.


Highlight under the brow bone with white eyeshadow, and blend in between the turquoise  and brown with a pale turquoise or pale green.


Blend the black eyepencil and the turquoise eyeshadow with a few smoky layers of black eyeshadow.


Handy Hint: Put a blob of Luxe eyeshadow of any colour anywhere on the eye. Then click the "Back" button to remove it. The Luxe eyeshadow goes, but the sparkles stay! This is really handy when you want sparkles, but don't have the right colour Luxe.


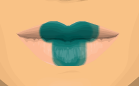
Cover the lips in nude lipstick.


Apply turquoise lipstick as shown in the picture.


Put Luxe lipgloss over the turquoise lipstick.


Apply brown blush under the cheekbones. Also use some turquoise blush under the eyes as shown. Make sure you don't cover the white highlight on the cheeks though. Otherwise the cheeks will look flat.


And there you go! Just choose a hairstyle, put a couple of pairs of eyelashes on, and put on some sea themed accessories.


Susanna x


Tuesday 12 June 2012

Creepy Doll

Here's some inspiration for a makeup style that I think is great for Halloween or fancy dress. Here it is!


Some close ups without accessories so you can see how I did it:


Why not try it, or make up your own Creepy Doll makeup designs? Send them in so they can be published here.


Susanna x

Sunday 10 June 2012

Fake Injuries with Makeup

This is great fun to try when you're bored ~ using makeup to replicate injuries. I tried out two: a black eye and a scar. What do you think?


Pretty cool, huh?


Why not try them out, or make up your own injuries. Send them in, and they could be posted here on the blog.


Susanna x

Friday 8 June 2012

Colours to Suit your Eye Colour

Certain colours go better with certain eye colours than others, and here's a helpful guide to colours that suit you, and which ones to avoid!


Green Eyes

Good eye shadow colours: 

Forest green, light green, chartreuse (lime green), turquoise, purple, taupe (beige), apricot, chocolate, gold, copper.

Colours to avoid: 

Blue, Silver, certain shades of pink.


Brown Eyes

Good eye shadow colours: 

Blue, navy blue, dark brown, blue grey, plum, gold, vanilla, purple violet and nutmeg.

Colours to avoid:

Black, as it tends to be too dark. Deep browns, plums and charcoals are good alternatives.


Blue Eyes

Good eye shadow colours:

Grey, taupe, camel, browns, charcoal, black, pink, fuschia, copper, lilac, violet, silver and gold.

Colours to avoid:

Blue.


Hazel Eyes

Most colours go great with your eyes, seeing as your eyes are kind of a mish- mosh of blue, brown and green. If you want to be more specific, check to see whether your eyes are mostly blue, brown or green, and then use that as your main colour.


Grey Eyes


Lucky you! You can wear absolutely anything.


Susanna x


Complimentary Colours

Here's a little lesson on complimentary colours!

Complimentary colours are basically colours that are opposite each other on the colour wheel. There are 3 main pairs:

Purple and Yellow
Orange and Blue
Red and Green

When you're stuck for ideas for your medoll, you really can't go wrong with  complimentary colours. They look really dramatic, and really make your eyes stand out.

Here are some examples of complimentary colours using eye makeup:


Purple and Yellow


Orange and Blue


Red and Green


Susanna x